Tapping to toggle thruster on and off. Dragging on my middle finger to adjust strength.
visionOS Version: 2.3
Difficulty: Advanced
Related Projects: Spatial Physics Playground
Introduction
Hello!
I’ve spent a bunch of time in 2024 working on my Spatial Physics Playground app for Apple Vision. I’ve been treating it as a way to keep learning new things. So much so that I’ve forgotten to write anything on my blog for the whole year. Whoops.
To help rectify that, I wanted to write up a few how-to posts on some of the things I’ve learned, just to help solidify it in my own mind.
This post in particular will guide you through implementing custom hand gestures for Apple Vision. We’ll be using these gestures to control a Thruster toy in the Spatial Physics Playground app, by adjusting its strength and toggling it on and off without the user needing to use UI buttons.
There’s also not a whole lot of tutorials like this written for Apple Vision development yet, and I wanted to try writing out more longer-form guides like this.
To be honest, this guide might be a little too long, but I didn’t want to break it up into parts.
Hopefully you can find some use from it! If you have questions or feedback about issues in here (I’m sure there’s at least a few), feel free to reach out to me:
Goals
The goal of this tutorial is to use ARKit hand tracking data to implement custom hand gestures inside an app for Apple Vision.
This guide will require quite a bit of math, so if you aren’t familiar with linear algebra you may have a little trouble following along. Hopefully I’ve been able to simplify it enough for anyone to understand, but I lack the perspective to know for sure.
In addition, the code in this guide is written to be read and understood, not copy/pasted. If you paste code from this guide into your own project, you will need to make changes to get it working.
With the goal in mind our question then becomes “How can you implement meaningful custom hand gestures for Apple Vision?”
For my first attempt at learning and writing this code, I needed something simple enough to implement so I’m not completely overwhelmed. I also wanted an idea that would be fun to use as a user of my app.
But it’ll be hard to discuss what I implemented without first discussing the app.
Don’t worry, it’ll be quick.
What is Spatial Physics Playground?
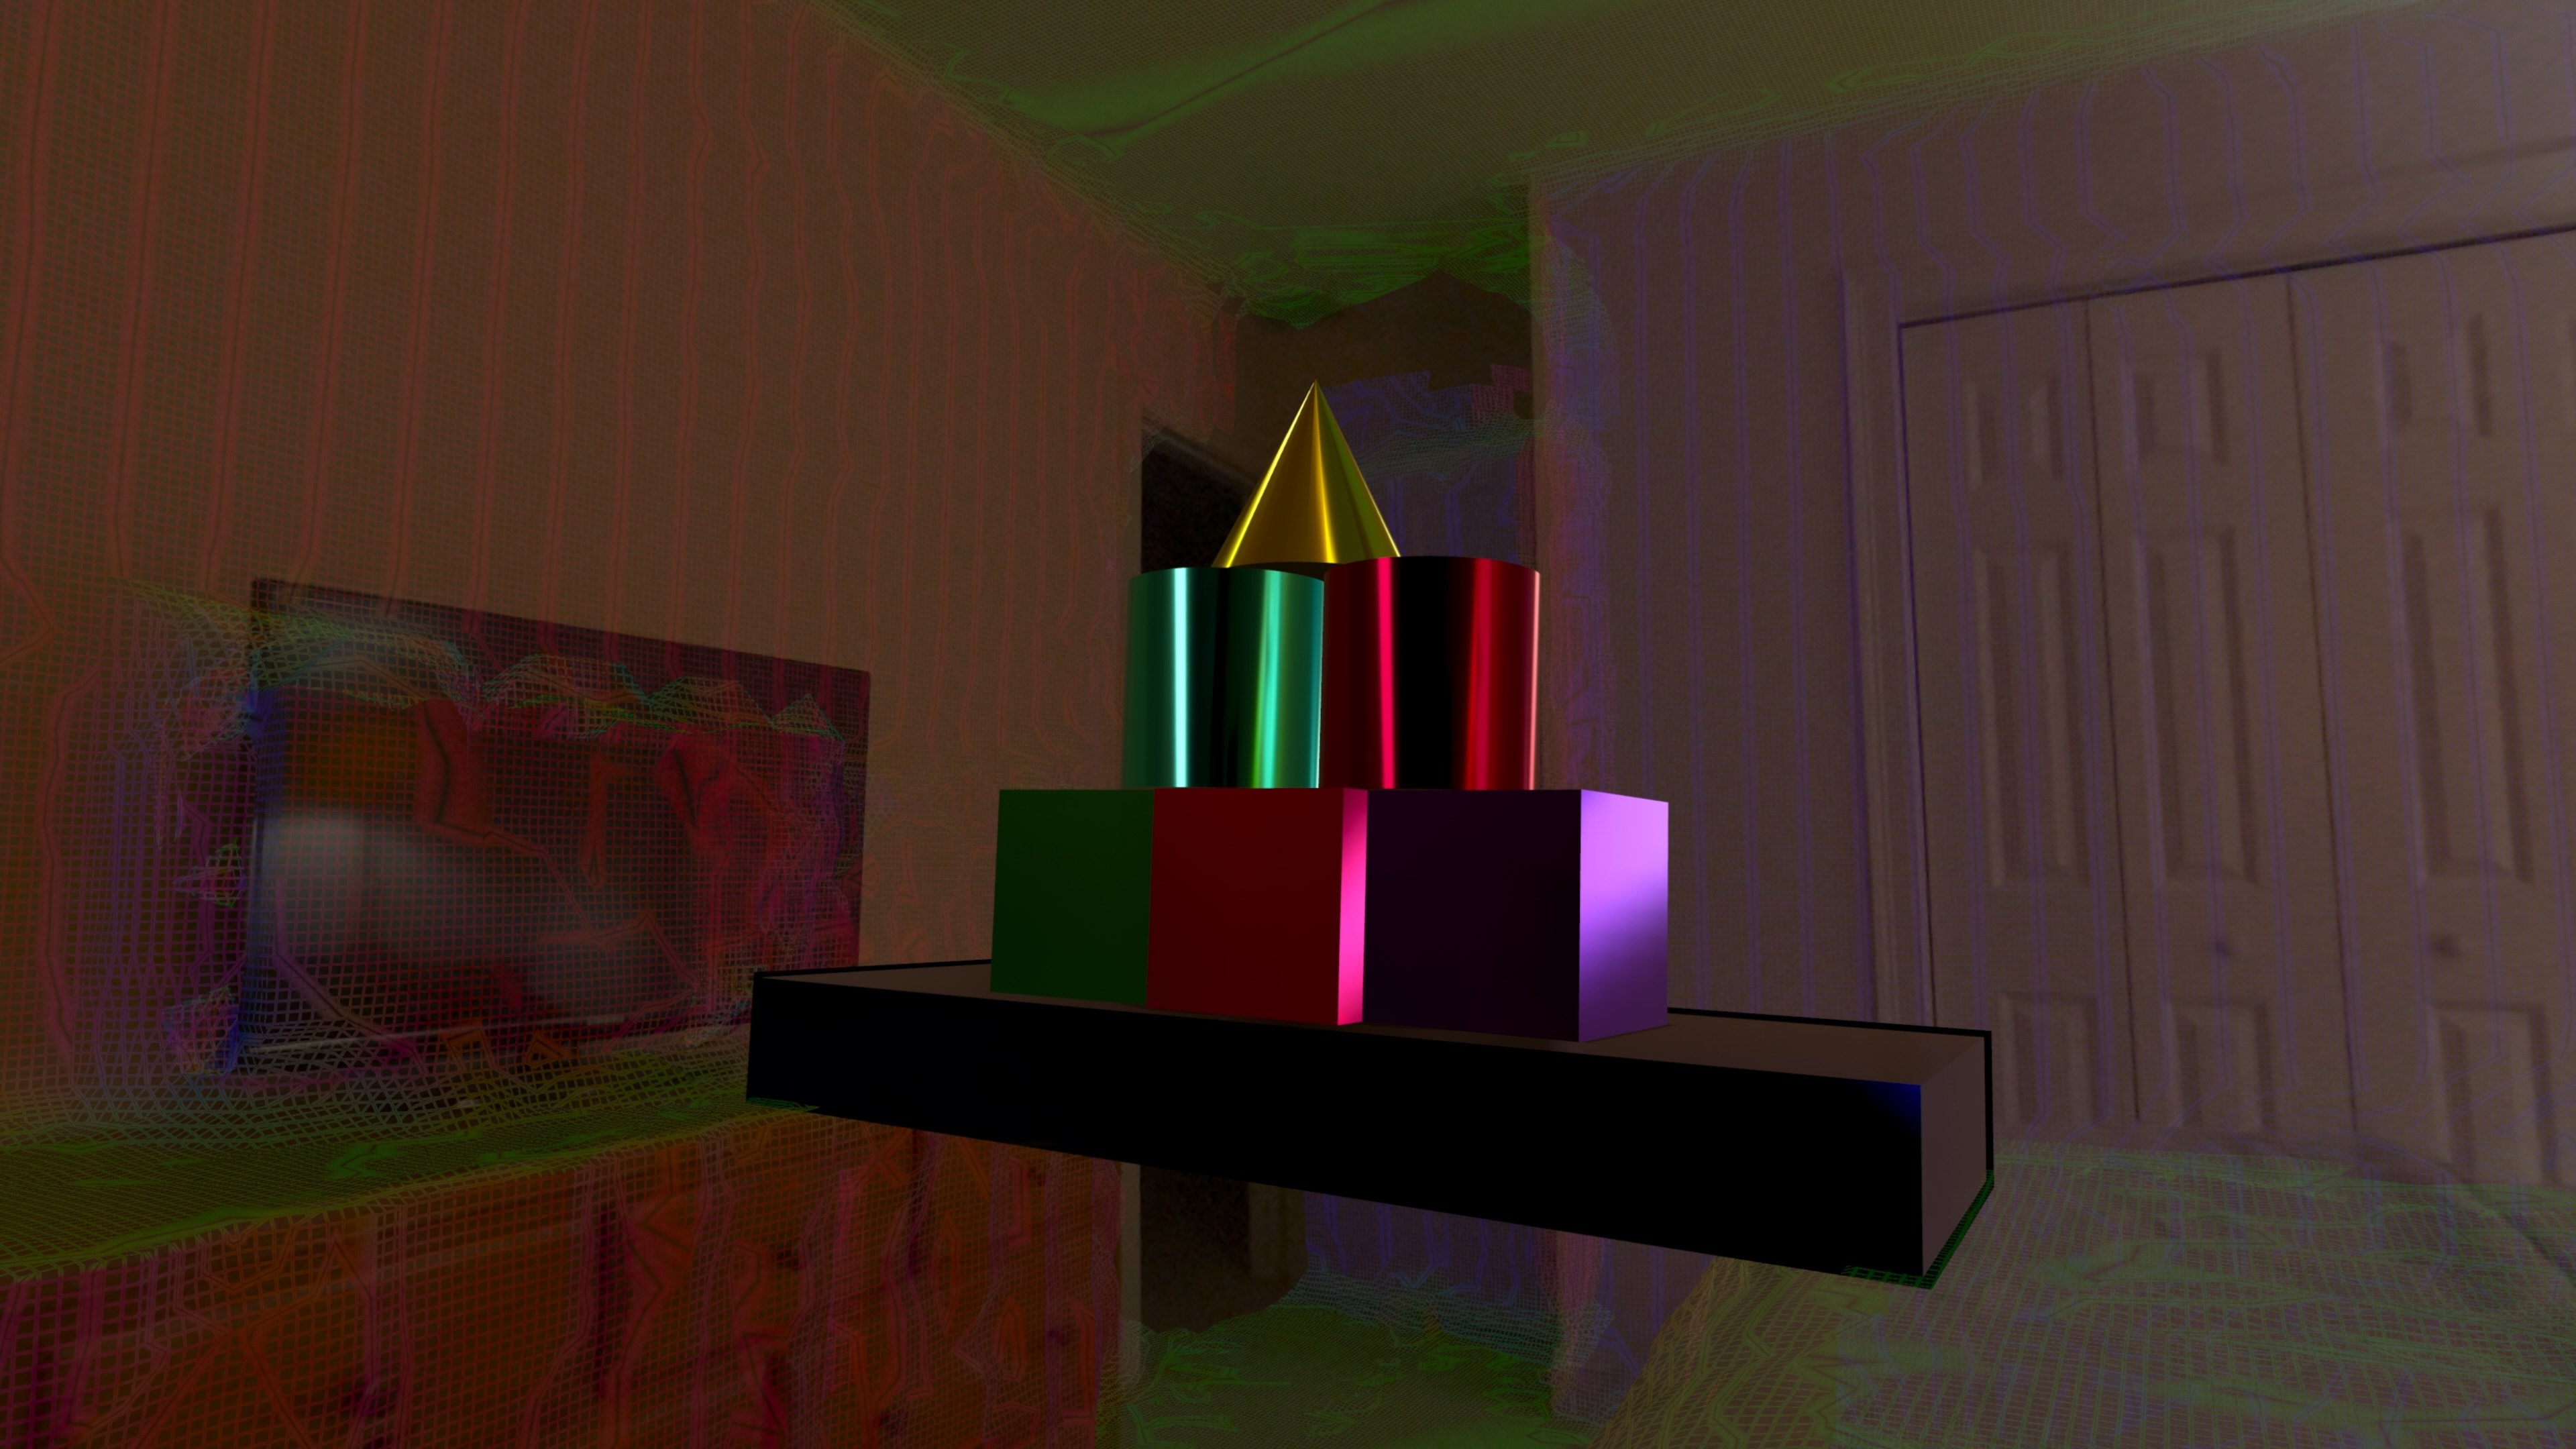
An image of Spatial Physics Playground
Spatial Physics Playground is more of a sandbox than a real game, there’s no objective or goals.
You place physics objects into your room and interact with them by poking them with your finger, throwing them around your room, or attaching various objects to them like ropes or hoverballs.
The elements like ropes and hoverballs are in a category of tools that I call “toys” which are really just excuses for me to implement things.
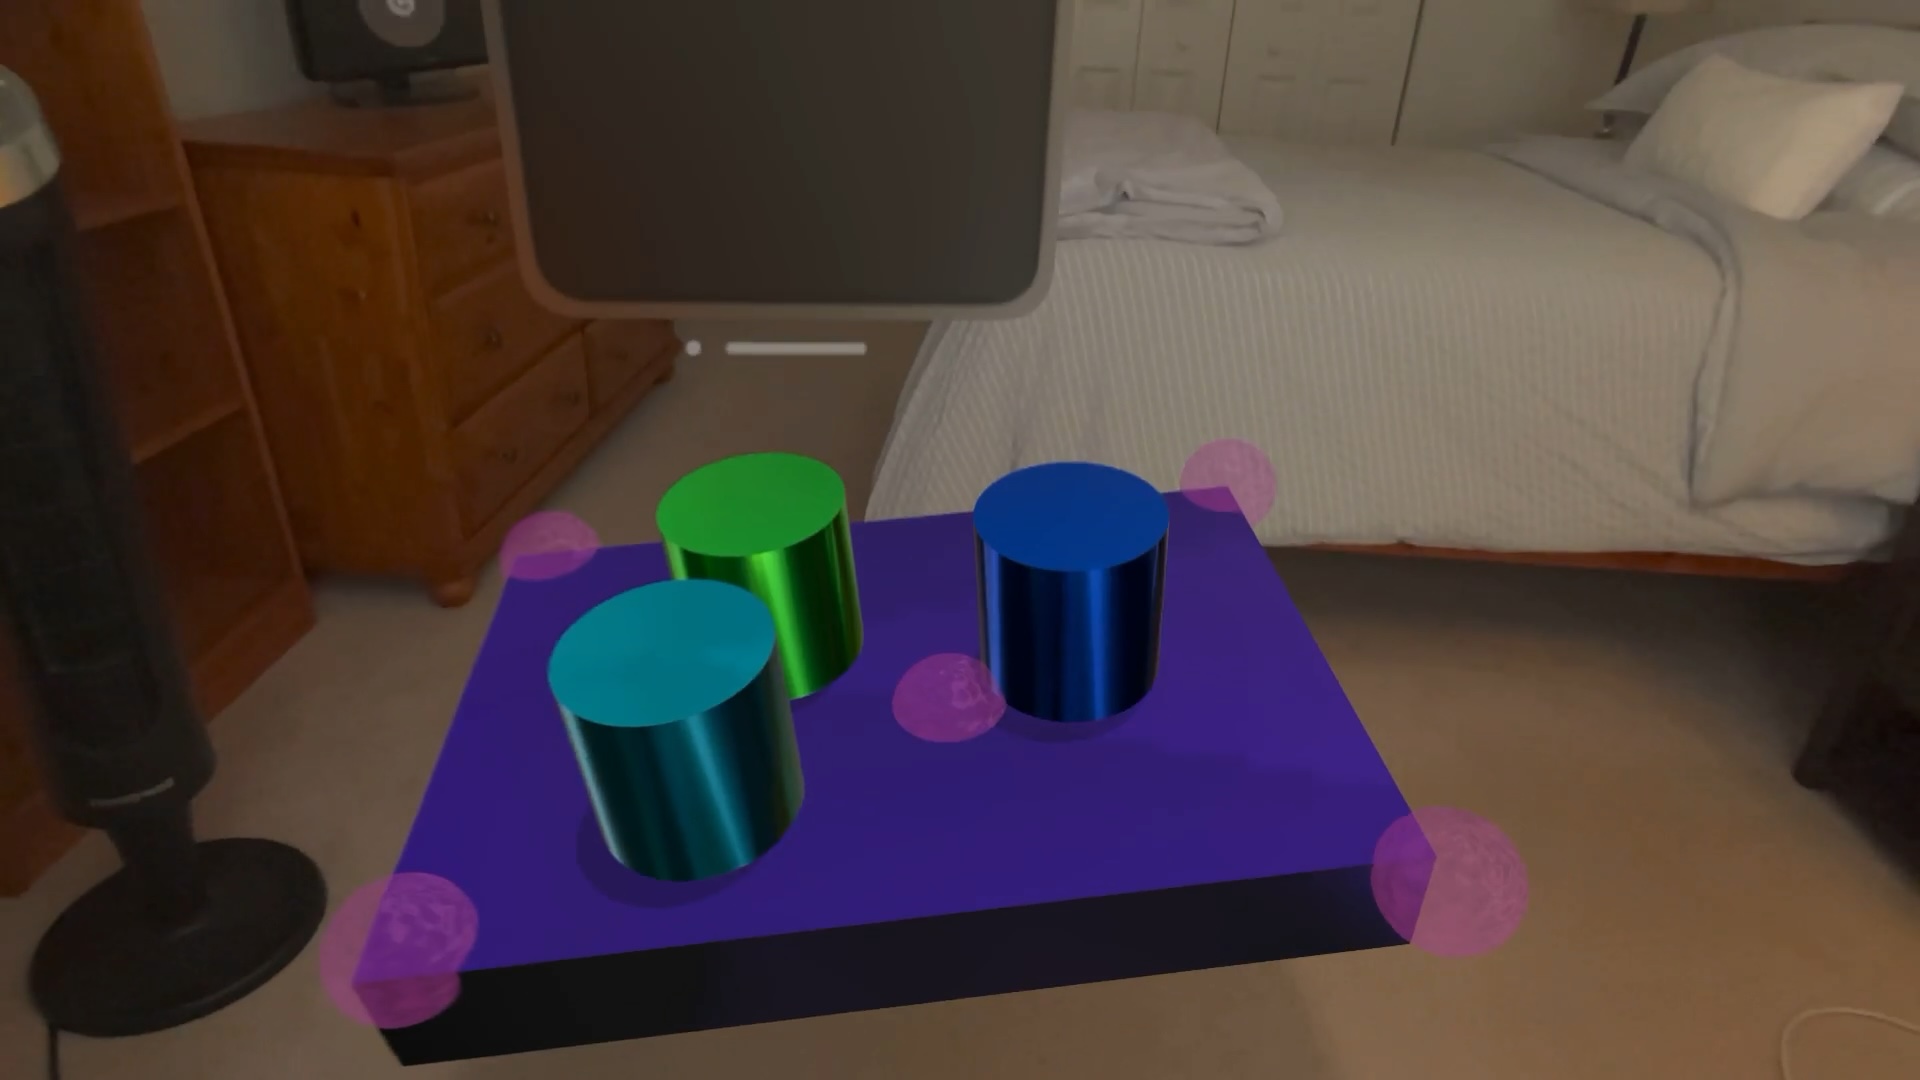
Hoverballs, the idea pretty much ripped out of Garry’s Mod
My previous experience with retrieving hand state was with implementing hand interaction with physics objects (i.e. poking them).
That’s pretty simple as far as detection goes, as all that I really need to do as a developer was place a physics object at the user’s finger.
Let’s make a toy that uses actual hand gestures for some type of control. And Garry’s Mod was such a great source of inspiration with the hoverball tool, how about I steal borrow another idea from it?
The Thruster Toy
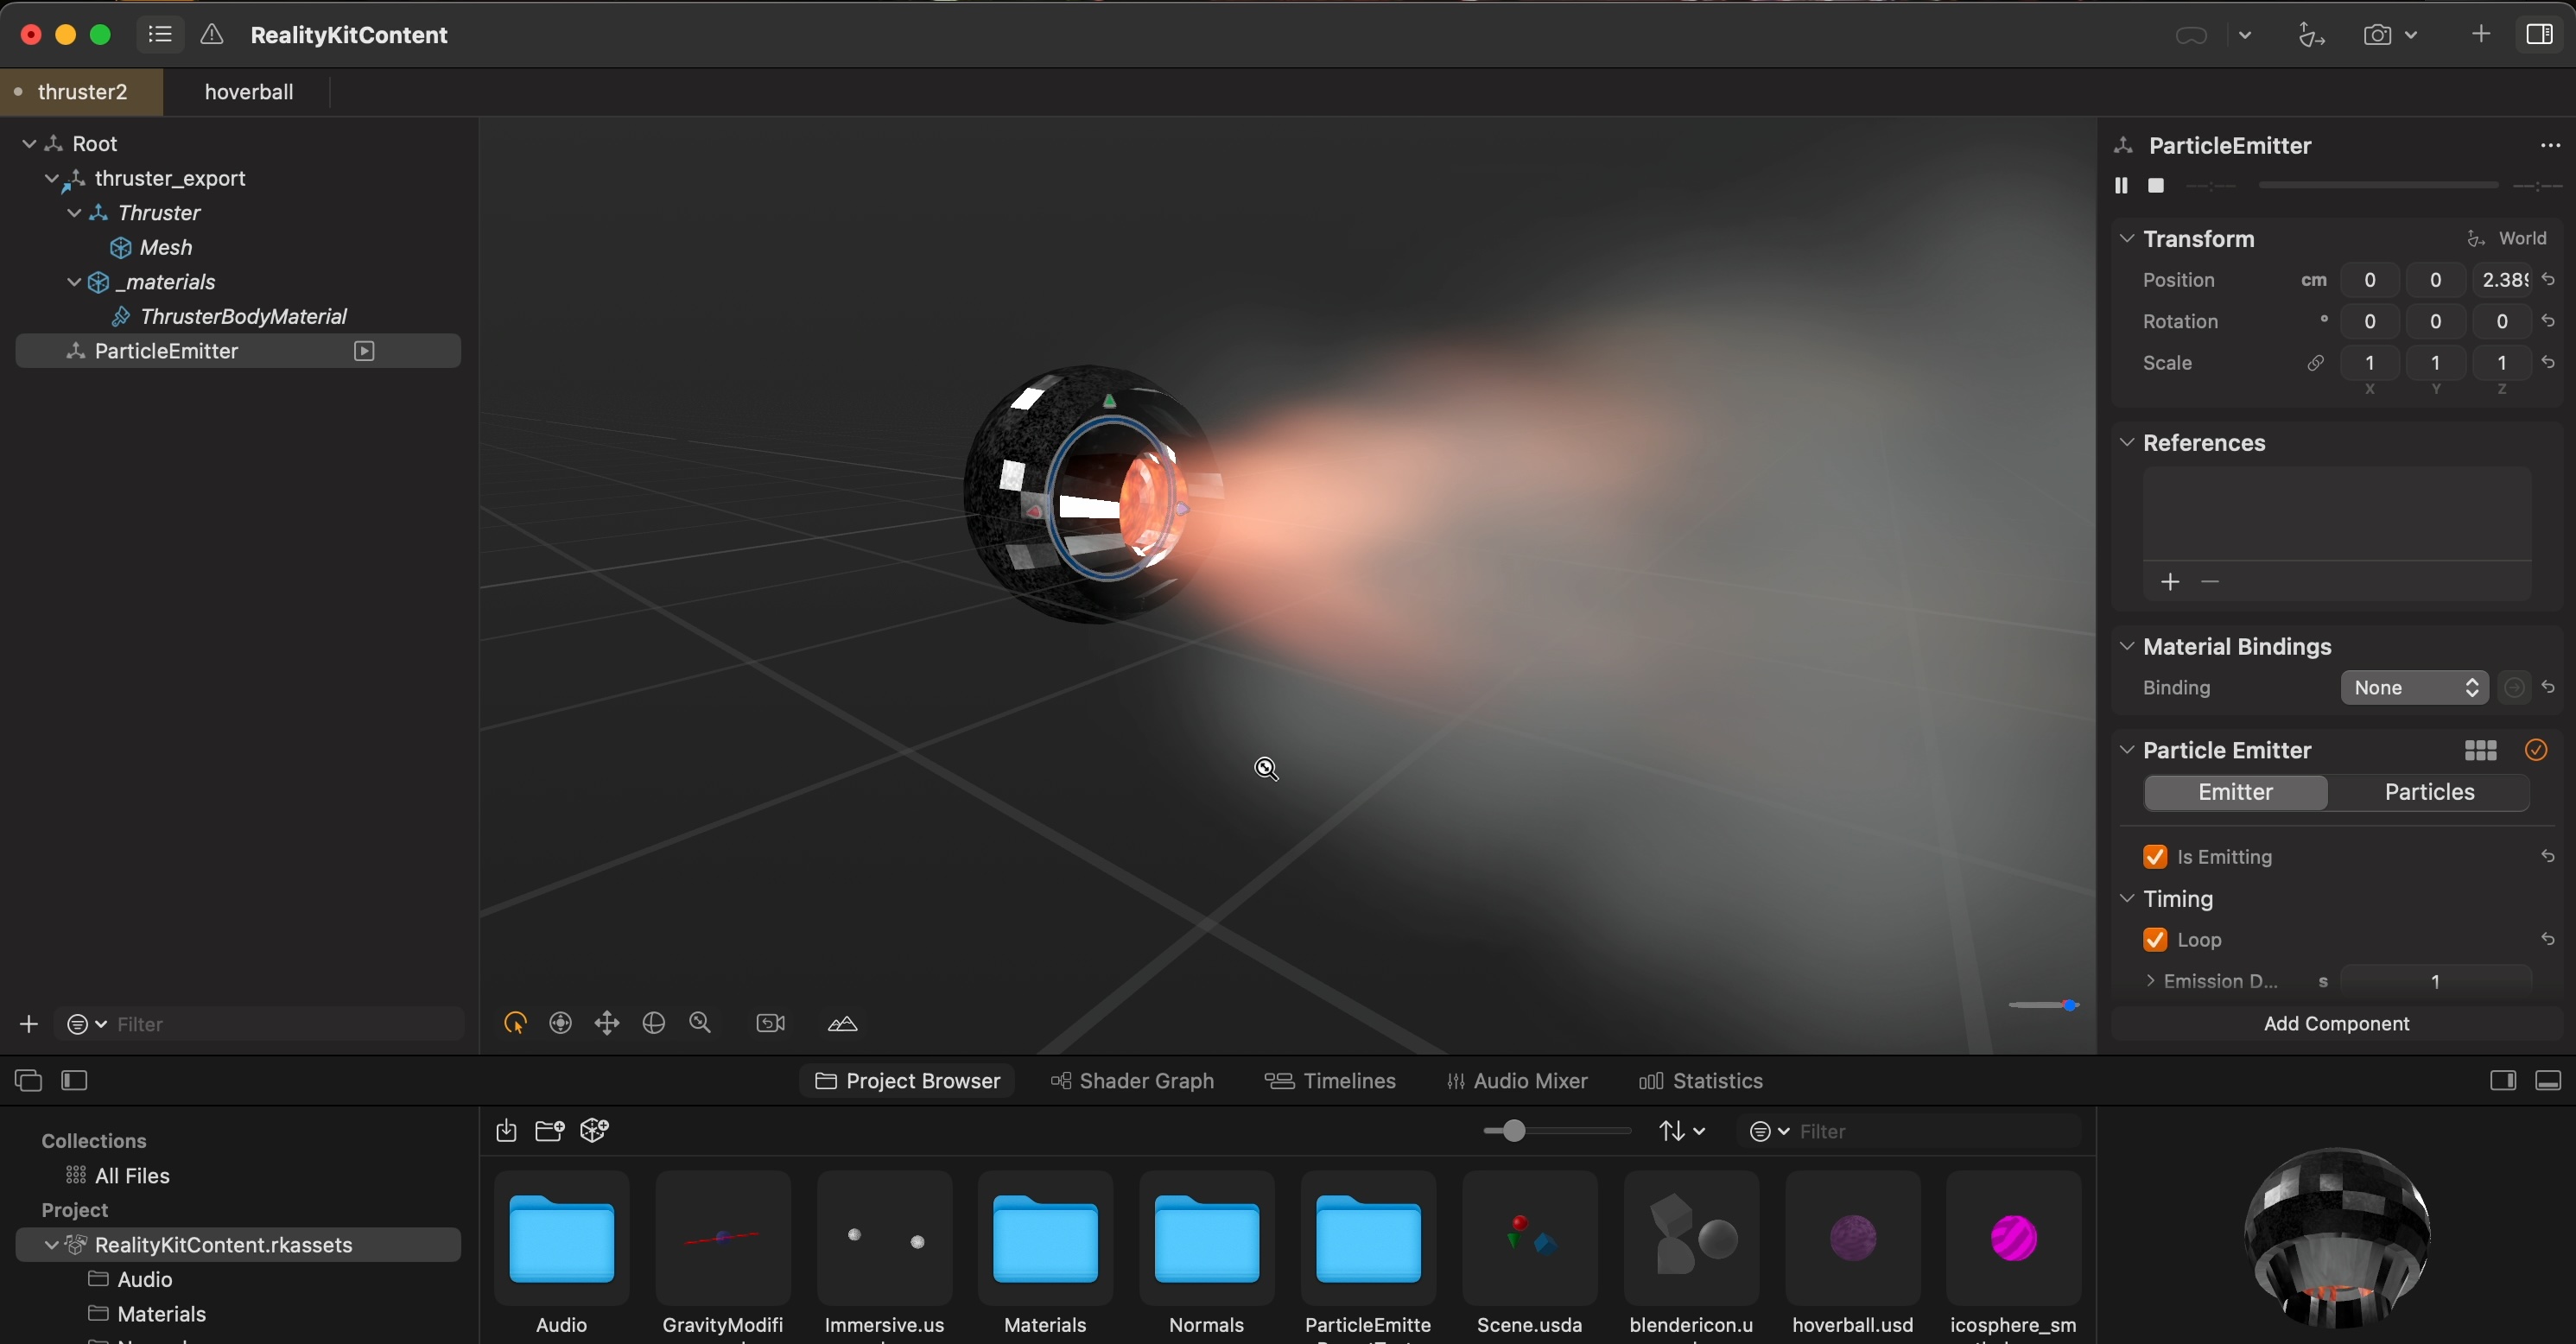
An early version of the thruster in Reality Composer Pro
The idea for the toy is simple. The hoverball tool works by applying a constant upward force to the object it’s attached to. Let’s just change which direction the force is being applied (and maybe even vary the strength), and we have a thruster!
The specifics of the thruster implementation (such as actually applying forces to objects or how to integrate particles into the thruster) aren’t important for this guide, though.
In fact, I’m going to try as hard as possible to gloss over a lot of how the thruster works internally.
Not because I want to keep it a secret, but just look at how small your scroll bar is! I’m trying to keep this thing as brief as possible. (And clearly not doing a very good job at it!)
Let’s consider how we can implement hand gestures to control the thruster.
Hand Gesture Idea
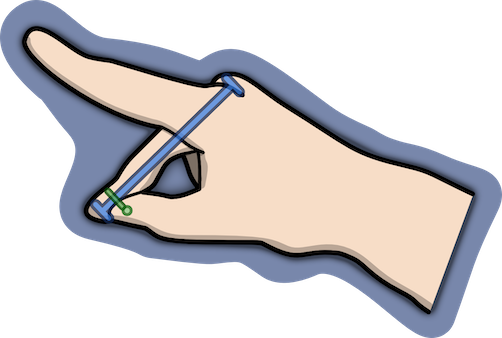
As a first attempt at implementing hand gestures, I wanted something very simple. I eventually decided on a just tap and drag gesture using the middle finger (as the index finger is pretty much the default system-wide tap gesture finger).
The “tap” gesture will be the user touching anywhere along their finger with their thumb. The “drag” gesture will be the user dragging their thumb up and down their finger.
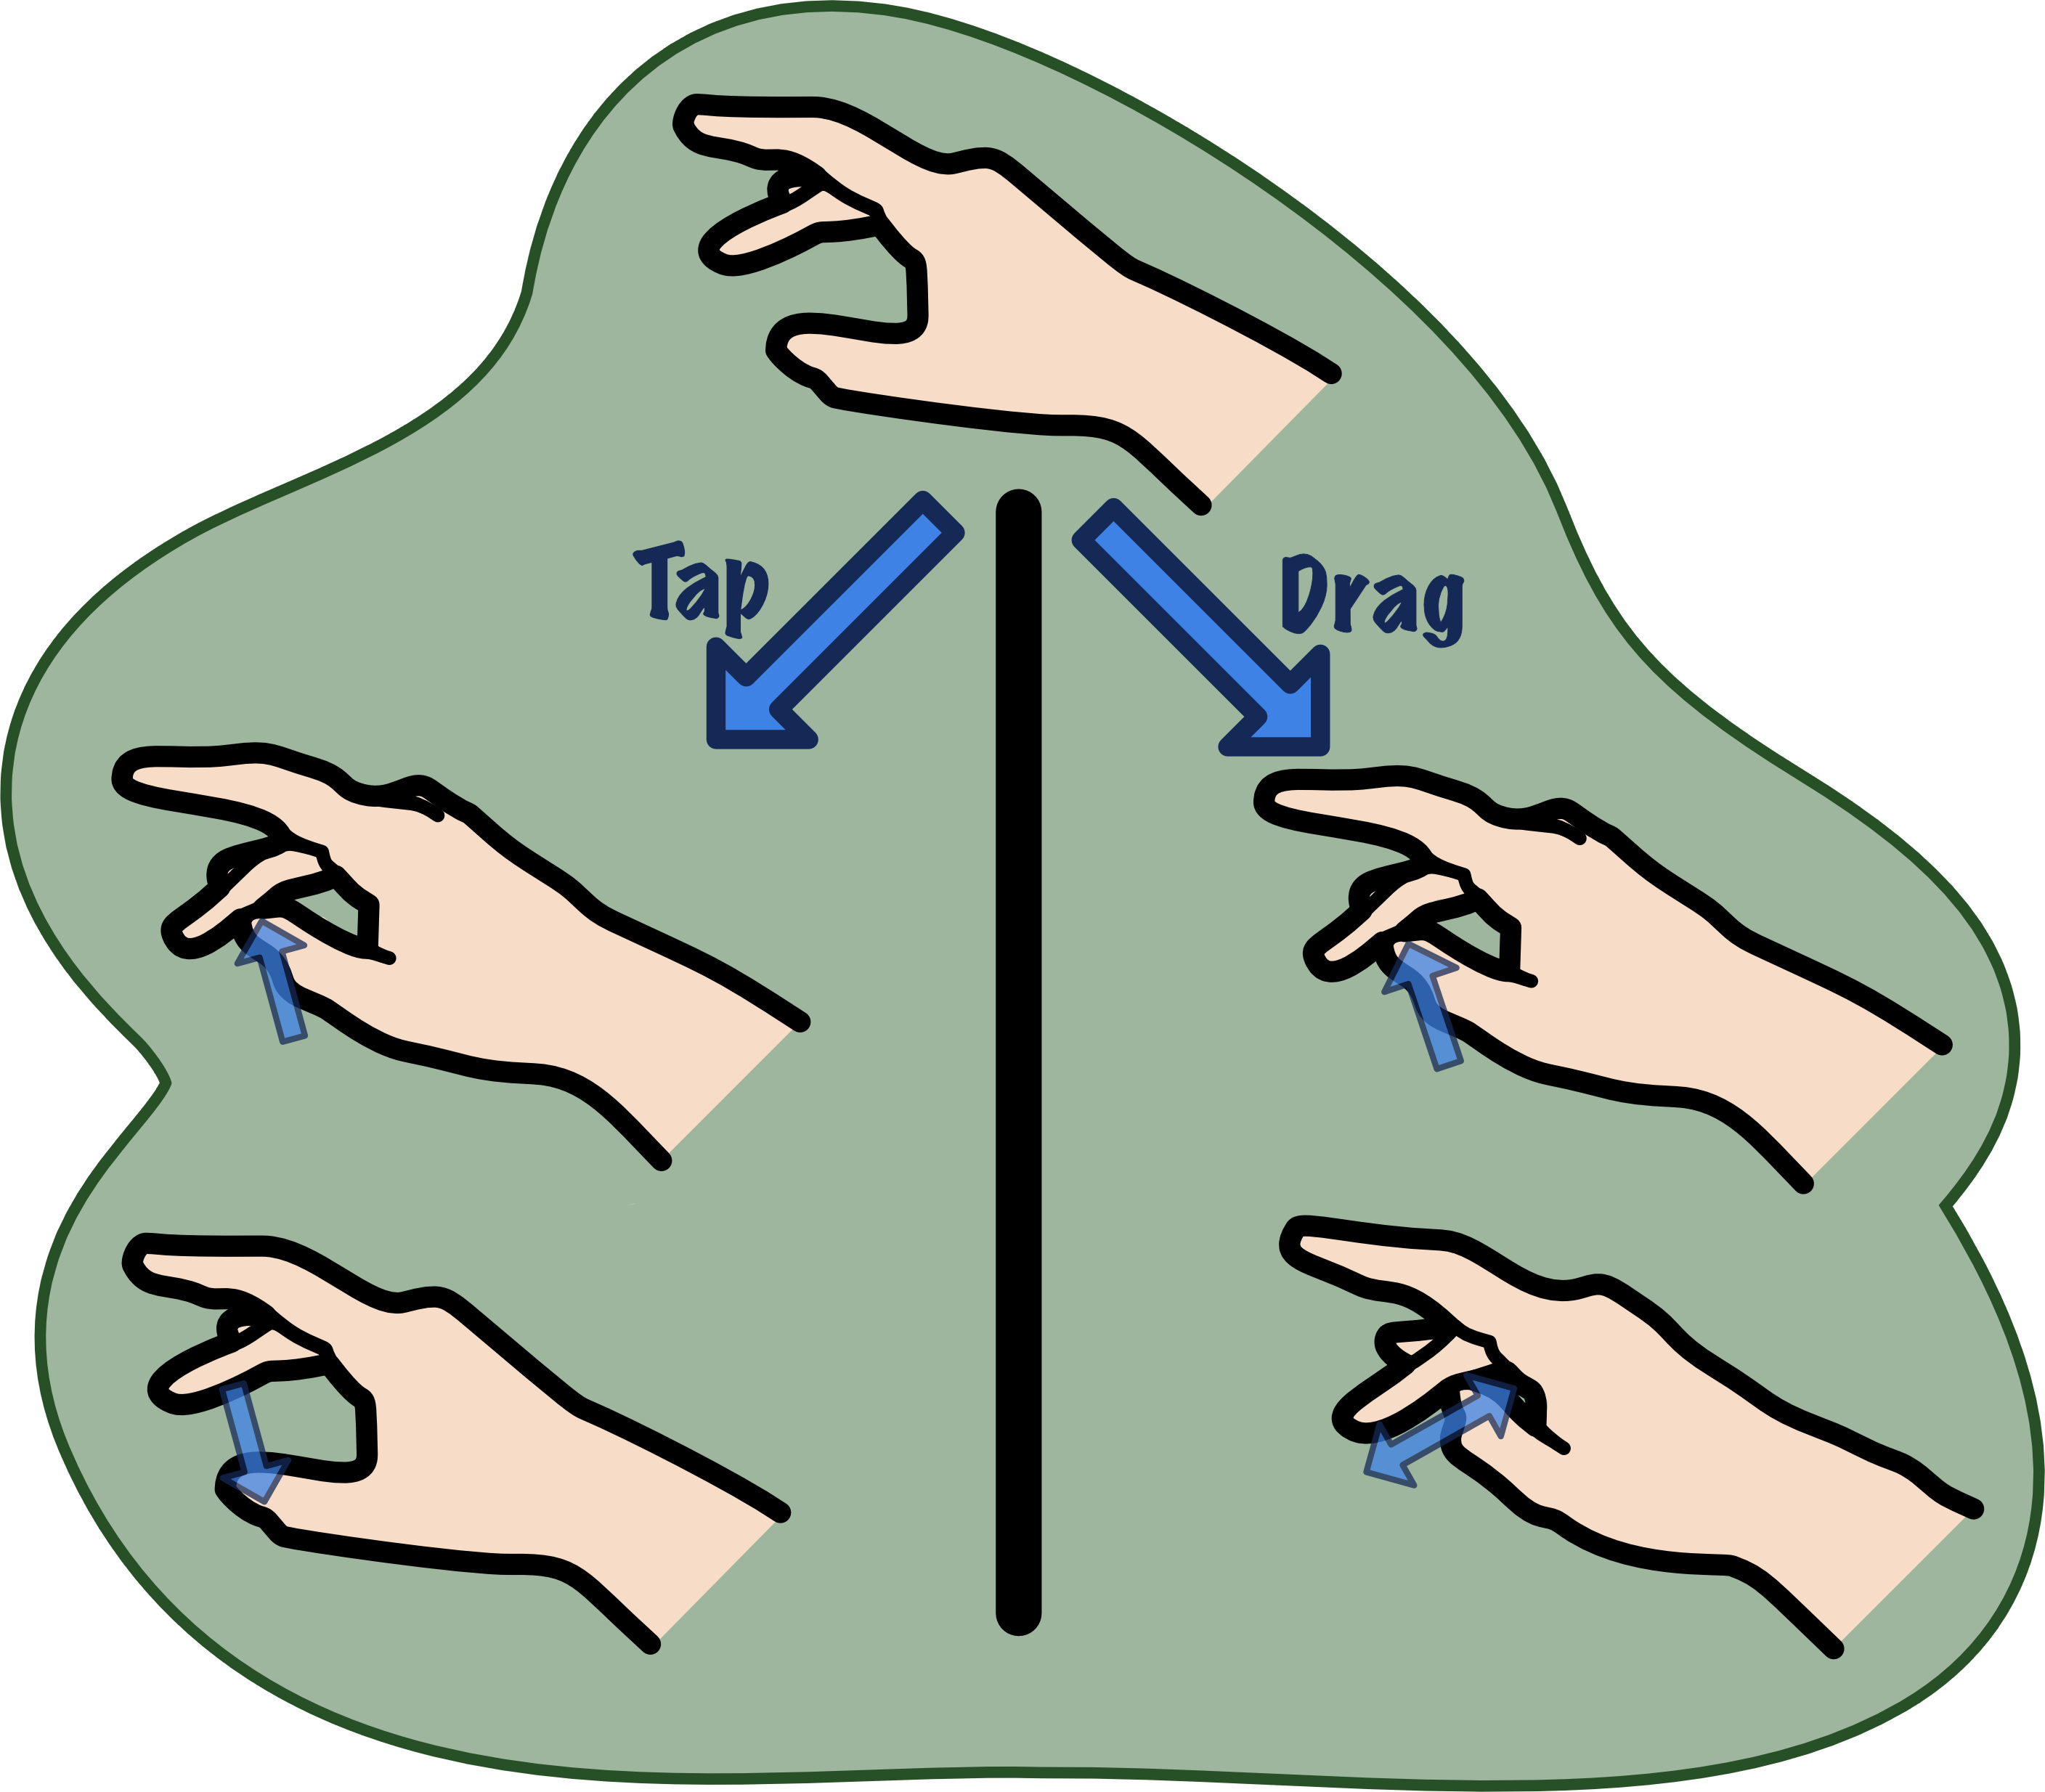
The tap and drag gestures
We have our gestures, what do they control?
I think a natural choice for a tap gesture would be to toggle the thruster on and off.
For the drag gesture, we can control the thruster’s strength. Move your thumb towards the tip of your middle finger to crank up the power, and move it towards the knuckle to turn it down.
Sounds good to me! Let’s get started.
Planning
What’s Provided by ARKit?
I always like to start by taking a quick look at the documentation before I begin writing code.

Image courtesy of
Substack - Stuart Varrall
Original source
Apple - Meet ARKit for spatial computing
The image above shows the joints that ARKit provides for each hand. When data is provided to us, these are the individual joints that are going to be tracked.
Looking into the documentation a bit more (which we’ll go over later), we find that each joint has a transform associated with it, which will give us its position and orientation.
Well, one slide in and I’m already tired. I think that’s enough documentation for now, don’t you? Thankfully, this sounds like all we need to get started.
For our implementation, we’ll be taking a look at the thumb and middle finger joints.
Specifically, we’ll be looking at the .handThumbTip (number 4), .handMiddleFingerTip (number 14), and .handMiddleFingerKnuckle (number 11) joints.
Using these joints, I think we’ll be able to implement our tap and drag gestures.
The Idea, Mathematically
A visualization of the math behind the gesture recognition
The plan is to project the thumb tip onto an imaginary line that extends from the middle finger tip to the middle finger knuckle. Then, we can see how far away the thumb is from this line.
If the thumb is close enough to the line, we can consider it to be ’touching’ the middle finger. At that point, we can see if the thumb starts to move up or down the middle finger (drag), or if it moves away without moving up or down (tap).
For simplicity, we’ll just be using this single line. Further refinements of this implementation could break this down into multiple line segments. Probably at least two, one from the middle finger tip to the “Intermediate Base” joint (number 12 in the diagram above), then one from there to the knuckle.
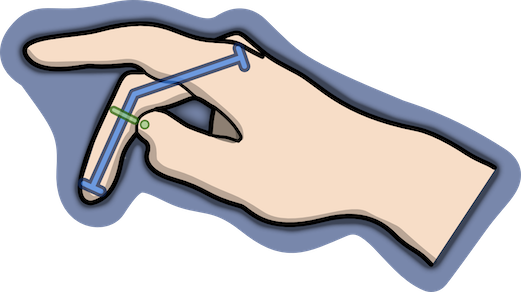
Using two line segments better tracks bends in the user’s middle finger
For overkill, you could even have three different line segments, one between each tracked joint!
However, for now we’ll just stick to the single line segment. This post is already long enough as it is. We can always refine the implementation after we’ve got the basics down.
Those of you who fear math, now’s the time you might start worrying a little bit. As we’re about to enter the realm of…linear algebra.

DALL-E 3 - OpenAI
Forgive me for using AI-generated images.
Hopefully it’s okay when it’s dumb?
Given a point and a line, as we have above, projection provides us with the point on the line which is closest to our provided point.
This is a concept that’s going to be very useful for our problem. We need to know if the thumb is touching this imaginary line, and to do that we need to know the closest point on the line to the thumb.
As part of this, the projection formula will also provide us with a way we can track the thumb’s movement up and down the middle finger over time. Useful for a drag gesture!
…
Well, we can’t put it off any longer. It’s time to talk about math.
Background Math: Linear Algebra
The Line Projection Formula
The formula for projecting an n-dimensional point onto a 1D line is this:
\[ P_A(\mathbf{v}) = \frac{\mathbf{u} \cdot \mathbf{v}}{\mathbf{u} \cdot \mathbf{u}} \mathbf{u} \]Where:
- \( P_A(\mathbf{v}) \) is the projected point
- \( \mathbf{u} \) is the basis vector of the line you’re projecting onto
- \( \mathbf{v} \) is the point you’re going to project (but have not yet)
Both u and v are n-dimensional vectors, but in our case we’re going to be working in 3D space.
Dot Products
In case you’re completely unfamiliar with dot products (the dots between the letters in the formula), they’re just a way of multiplying two vectors together to get a scalar value (or, in other words, just a regular number, not a vector).
Dot products have many, many uses and are well worth familiarizing yourself with, if you haven’t already.
This guide won’t dive into how to mathematically use dot products, so here’s the bare minimum you should know:
The dot product of two 3D vectors is the sum of the products of their corresponding components. So, for example, the dot product of two 3D vectors is:
\[ \mathbf{u} \cdot \mathbf{v} = u_1 v_1 + u_2 v_2 + u_3 v_3 \]Or, in code: (u.x * v.x) + (u.y * v.y) + (u.z * v.z)
But in actual practice, it’s more often like:
dot(u, v)

 // ...or sometimes

u.dot(v)

// ...and similar.
The big takeaway here is that a dot product results in a scalar value. In other words, a dot product takes in two vectors and outputs just a regular number.
How to Implement Tap Gesture?
At this point, you hopefully have a good idea of how you might implement the projection formula in code. This gives us the thumb’s projected position on the line.
But what now?
Now we need to check whether the thumb is touching the line.
To do that, it sounds like we need to calculate the distance between the thumb and the projected position on the line. In order to consider the thumb ’touching’ the middle finger, the thumb has to be within some radius of the projected point on the line.
What radius? Well, I don’t have a good answer. Whatever the radius of the average person’s middle finger is…
We’ll need to discover a reasonable threshold through testing out the gesture to see what feels best.
Keep in mind that we’re only using a single line segment that goes from the finger tip directly to the knuckle.
Some people naturally bend their fingers more than others. If a user has a strong bend to their middle finger, the imaginary line is going to go through the air in front of the user’s middle finger.
So the threshold should be large enough so that the thumb can’t accidentally go ’through’ this line too far and exit out the back.
A failed detection because the radius is too small.
What you don’t want to have happen.
How to Implement Drag Gesture?
Let’s take a closer look at the projection formula and try to break it down a little bit:
\[ P_A(\mathbf{v}) = \frac{\mathbf{u} \cdot \mathbf{v}}{\mathbf{u} \cdot \mathbf{u}} \mathbf{u} \]To me, this looks like “something” (\( \frac{\mathbf{u} \cdot \mathbf{v}}{\mathbf{u} \cdot \mathbf{u}} \)) multiplied by the line we’re interested in (\( u \)). What is this “something”?
Well, we can tell that it’s a dot product divided by another dot product. And thanks to the section on dot products, we also know that they result in scalar values, which means this whole “something” is itself a scalar.
If we know that this “something” is a scalar, and we’re multiplying it by the line (a vector), then the result has to be a point somewhere along that line.
So then, this “something” must be the component that tells us how far along the line the projected point is. Let’s call it \( \mathbf{t} \):
\[ t = \frac{\mathbf{u} \cdot \mathbf{v}}{\mathbf{u} \cdot \mathbf{u}} \]t is the component that tells us how far along the line u the projected point v is.
If we track this over time, we can tell if the thumb is moving up or down the line.
In other words, tracking t over time is how we’ll implement the ‘drag’ gesture.
Combining Tap and Drag Gesture Recognition
At this point, you might think we’re ready to dive into implementing things, but hold on. We need to consider what happens when we combine the availability of both gestures.
We know when the user has begun to touch their thumb to their middle finger, but we don’t exactly know which gesture they’re about to perform.
People aren’t machines, and the hand tracking isn’t perfect, so our code is always going to see some slight up and down movement as the user moves their fingers, even as they’re attempting to perform a tap gesture.
Let’s also consider a couple of factors when implementing the gesture recognition system:
- Minimum movement threshold
There needs to be some minimum threshold for movement up and down the line before we consider the action a drag gesture.
Again, this threshold will need to be discovered through testing. There’s really no way to mathematically figure out the “best” threshold without trying it out for yourself.
- Touch time
In addition, it may also help to consider how long the user has been touching their thumb to their middle finger when attempting to determine which gesture the user is performing.
If the touch time is longer than a second, it’s unlikely the user is attempting a tap gesture.
Likewise, if we detect a large drag in less than a quarter of a second, it’s unlikely the user meant to perform a drag gesture.
I think that’s enough planning for now, don’t you? How about we dive into some code?
Implementation
⚠️ Important Note
This guide was published when visionOS 2.3 was the latest version
If you’re reading it in the future, this code may be outdated and may not work without significant modifications.
I’m going to move quickly through the Apple-specific code, mostly because it’ll be outdated before 2025’s over, I’m sure.
So, for that reason, here are some optional but recommended readings to get you up to speed with hopefully more up to date code than mine:
📖 Recommended Reading
- Understanding the RealityKit Modular Architecture
- Understanding Transforms
- Tracking and Visualizing Hand Movement
- Implementing Systems for Entities in a Scene
- WWDC Spaceship demo - Apple’s Spaceship demo that uses hand tracking to control a spaceship flying around your room.
(Hopefully Apple Documentation links age better than Apple platform code.)
This guide is going to assume that you’re starting from scratch, so I’ll be going over the setup of the app as well as the implementation of the hand gestures.
App Setup
Apps on Apple Vision work the same as apps for other Apple platforms. But to get to the interesting data, there’s some limitations that we’ll have to work around.
For example, certain data can only be obtained under certain circumstances. Specifically, certain data providers (like the hand tracking provider) can only be run inside immersive spaces (where your app is the only one visible to the user).
Inside your app’s body, create an ImmersiveSpace, and a View to put inside it.
@main
struct MyCoolApp : App {
  @state private var viewModel = ViewModel()
  @state private var handTrackingModel = HandTrackingModel()

  var body: some Scene {
    WindowGroup {
      DefaultView()
        .environment(viewModel)
    }

    ImmersiveSpace {
      ImmersiveView()
        .environment(handTrackingModel)
    }
  }
}
Setting up the main application structure, initializing the view models and configuring the immersive space with the necessary environment models.
Hand Tracking Provider Setup
Let’s set up the data provider, which provides us data.
Specifically, data about the transforms of the user’s hand joints.
Inside your immersive view, or perhaps inside a HandTrackingModel class, create an ARKitSession and HandTrackingProvider
@Observable
class HandTrackingModel {
  let arSession = ARKitSession()
  let handTracking = HandTrackingProvider()
}
A hand tracking model.
When the user enters the immersive view, request authorization for hand tracking and start the hand tracking provider.
struct ImmersiveView : View {
  @Environment var handTrackingModel: HandTrackingModel

  var body: some View {
    // ...
  }.task {
    do {
      var dataProviders: [DataProvider] = [] // Required providers

      if await handTrackingModel.handTrackingIsAuthorized() {
        dataProviders.append(handTrackingModel.handTracking)
      } else {
        // Handle not having hand tracking available
      }

      try await arSession.run(dataProviders: dataProviders)
    } catch {
      // Handle error
    }
  }
  .task {
    await handTrackingModel.processHandTrackingUpdates()
  }
}
Requesting authorization for hand tracking and starting the hand tracking provider.
class HandTrackingModel {
// ...
    func handTrackingIsAuthorized() async -> Bool{
      // You may want to call this function *before* the ImmersiveView is shown,
      // if you'd like to control when the user is asked for permissions.
      return await arSession.requestAuthorization(for: HandTrackingProvider.requiredAuthorizations)
        .allSatisfy{ authorization in authorization.value == .allowed }
    }
/// ...
}
Checking if hand tracking is authorized.
Remember to add NSHandsTrackingUsageDescription to your app’s Info.plist file. Otherwise, your app will crash when you call requestAuthorization.
<!-- ... -->
<key>NSHandsTrackingUsageDescription</key>
<string>A short description explaining why your app needs this permission.</string>
<!-- ... -->
Info.plist entry for hand tracking permissions.
Handling Updates and Storing State
Let’s store the latest state of the user’s hands in some variables. First, let’s define a struct to store this state.
struct HandsStatus {
    var left: HandAnchor?
    var right: HandAnchor?

    // Useful utility function:
    func forChirality(_ chirality: HandAnchor.Chirality) -> HandAnchor? {
        if chirality == .left {
            left
        } else {
            right
        }
    }
}
A struct to store the latest state of the user’s hands and retrieve the state for a specific hand.
And let’s store the latest hand state in a global that can be accessed by the System that we’re going to implement later.
// In global scope, possibly inside a Globals.swift or similar.
var latestHandTracking = HandsStatus()
Ew, a global.
I dislike using global variables, but it’s what I did in Spatial Physics Playground (which was based off some Apple documentation sample code).
I also haven’t yet found a way to avoid it either, as there doesn’t seem to be any mechanism to transfer external data into a System.
Refactoring out the global is left as an exercise for the reader. And my future self. 😊
Now let’s update the HandTrackingModel to store the latest hand state.
class HandTrackingModel {
  // ...
  func processHandTrackingUpdates() async {
    for await update in handTrackingProvider.anchorUpdates {
      switch update.event{
      case .updated:
        let anchor = update.anchor

        if anchor.isTracked {
          // Update the appropriate hand info
          if anchor.chirality == .left {
            latestHandTracking.left = anchor
          } else if anchor.chirality == .right {
            latestHandTracking.right = anchor
          }
        } else {
          // Anchor has been lost, set hand tracking to nil.
          if anchor.chirality == .left {
            latestHandTracking.left = nil
          } else {
            latestHandTracking.right = nil
          }
        }

      default:
        break
      }
    }
  }
  // ...
}
Implementation of the processHandTrackingUpdates function, which stores the latest hand data in the global state.
Setting up a ThrusterSystem
We’re going to need a System that’s responsible for doing things based on the user’s current hand state. The system will need to determine (and store) the current/previous t values, whether the thumb is/was touching the imaginary line, etc.
Then, the System will use the stored information to affect the simulation. For example, it will update the thruster strength based on the t value, and toggle the thruster on and off based on the tap gesture, and so on.
💬 Note
During reviews of this guide, an LLM recommended to me that these two aspects of the ThrusterSystem (calculating hand state, then acting on it) should instead be separated into two different systems.
The idea being that other systems could be implemented in the future which can also make use of the hand state.
This all sounds like a great idea to me! But I haven’t done that for this guide.
I leave the execution of that idea as an exercise for the reader. 😊
(It’s great being a writer!)
Let’s define a stub System for now to get us started.
class ThrusterSystem : System {
  required init(scene: Scene) { }

  func update(context: SceneUpdateContext) {
    // TODO: This.
  }
}
The bare bones scaffolding for the ThrusterSystem.
Systems search through entities within a scene by using Components primarily (well, my Systems do), so let’s make a Thruster Component.
struct ThrusterComponent : Component {
  var enabled: Bool
  var strength: Float
}
The ThrusterComponent struct.
This is enough to let us toggle the thruster and adjust its strength at runtime. We’ll need to remember to add this component to the Entity when the user creates a Thruster in the app (but that’s for me to worry about, not you 😊).
We’re also going to need a structure to hold the thumb’s state inside the ThrusterSystem.
class ThrusterSystem : System {

  struct ThumbStatus {
    // t-value tracking
    var currentT: Float = 0.0
    var previousT: Float = 0.0

    // totalTChange:
    // Increases as the user moves their thumb either up or down the line
    // NOT meters, this is % of length of user's middle finger
    var totalTChange: Float = 0.0

    var contactTime: Float = -1.0
    var justReleased: Bool = false

    // When justReleased is true, the variables below
    // will help us determine what the user is doing.

    // isDrag: User is performing a drag gesture
    // Threshold of 0.01 was arbitrarily chosen, and seems to work well enough.
    // Increase for more 'deadzone' before a drag is detected.
    var isDrag: Bool { totalTChange > 0.01 } // i.e. 1% of the user's middle finger

    // isTap: User is performing a tap gesture
    // Again, thresholds were chosen arbitrarily and work okay. Adjust as needed.
    var isTap: Bool { !isDrag && contactTime > 0.05 && contactTime < 0.5 }

    mutating func reset() {
      currentT = 0.0
      // and all the other variables...
      // (removed for brevity)
    }
  }

  private var handStatus: [HandAnchor.Chirality: ThumbStatus] = [
    .left: ThumbStatus(),
    .right: ThumbStatus()
  ]

  required init(scene: Scene) { }

  func update(context: SceneUpdateContext) {
    // Still TODO...☹️
  }
}
ThrusterSystem has been updated with a new ThumbStatus struct and a handStatus dictionary.
Let’s work on implementing that update function!
Implementing the System Update Function
The update function will need to be broken up into two sections.
First, for each hand, we need to process the joint data and determine the thumb’s position on the imaginary line, and if it’s moved up or down.
Second, we need to update ThrusterComponent state based on the thumb state, then apply thruster forces to the entity.
So let’s implement it.
class ThrusterSystem : System {
  // ...
  func update(context: SceneUpdateContext) {
    // Part 1 - Update thumb contacts
    let deltaTime = Float(context.deltaTime)
    let handTrackingAvailable = latestHandTracking.left != nil || latestHandTracking.right != nil
    let isTapping: Bool
    let strengthChange: Float

    if handTrackingAvailable {
      // Implementation coming later:
      self.updateThumbContacts(deltaTime: deltaTime)

      // These two are implemented below:
      isTapping = self.determineTap()
      strengthChange = self.determineDrag()
    } else {
      // Explanation and implementation coming next:
      resetThumbContact(.left)
      resetThumbContact(.right)
      isTapping = false
      strengthChange = 0.0
    }

    // Part 2 - Update thruster components
    let query = EntityQuery(where: .has(ThrusterComponent.self))
    for thruster in context.entities(matching: query, updatingSystemWhen: .rendering) {
      if let thrusterComponent = thruster.components[ThrusterComponent.self] {
        if isTapping {
          thrusterComponent.enabled.toggle()
        }

        if abs(strengthChange) > 0.0 {
          let finalStrength = max(0.0, thrusterComponent.strength + strengthChange)
          thrusterComponent.strength = finalStrength
        }

        thruster.components[ThrusterComponent.self] = thrusterComponent
      }

      // Apply forces, etc.
    }
  }

  func determineTap() -> Bool {
    for chirality in [
      HandAnchor.Chirality.left,
      HandAnchor.Chirality.right
    ] {
      // If just released and isTap, then the user is tapping.
      if self.handStatus[chirality]!.justReleased && self.handStatus[chirality]!.isTap {
        return true
      }
    }

    return false
  }

  func determineDrag() -> Float {
    // We haven't discussed how to handle dragging with multiple hands simultaneously.
    // Here, we'll just handle it by taking the first hand we see that's dragging.
    // You may need to adjust for your own use cases.
    for chirality in [
      HandAnchor.Chirality.left,
      HandAnchor.Chirality.right
    ] {
      if self.handStatus[chirality]!.isDrag {
        guard let previousT = self.handStatus[chirality]?.previousT,
              let currentT = self.handStatus[chirality]?.currentT else { continue }

        return currentT - previousT
      }
    }

    return 0.0
  }
}
The update function implementation for the ThrusterSystem, including the determineTap and determineDrag functions.
Despite being long, this code should be mostly self-explanatory. The only functions we haven’t discussed are resetThumbContact and updateThumbContacts.
Resetting Thumb Contact
The way this works is that as long as the user isn’t touching their middle finger with their thumb, then resetThumbContact will be called every frame.
The first frame after the user lets go of their middle finger, this function will only set the justReleased flag to true and do nothing else.
The second part of the update function (the part that updates all of the ThrusterComponents in the scene) will see justReleased is true, and do whatever needs to happen.
On the next frame, resetThumbContact will be called again and this time it will actually clear the thumb state.
Further calls to resetThumbContact will be made every frame afterward, but do nothing until the user touches their middle finger again.
This provides us an easy way to handle hand tracking being lost: simply go through this same process (calling resetThumbContact every frame where hand tracking is not available).
Here’s the implementation:
class ThrusterSystem : System {
  // ...
  func resetThumbContact(_ chirality: HandAnchor.Chirality) {
    // If justReleased is true, then we need to actually clear the state.
    if self.handStatus[chirality]?.justReleased ?? false {
      // Clear state
      self.handStatus[chirality]?.reset()
    } else if self.handStatus[chirality]!.contactTime > 0.0 {
      // Only set justReleased if the user has made contact for at least one frame.

      // justReleased hasn't been set yet, so set it.
      self.handStatus[chirality]!.justReleased = true
      // Preserve state so that other functions can use it until next frame.
    }
  }
}
The resetThumbContact function implementation, as described.
Updating Thumb Contacts
We’ve got the rest of the framework in place, now it’s time to implement updateThumbContacts. Before we begin, let’s take a look at what data we have available to us from the hand tracking provider.
We’re passing the data to our System via the global variable latestHandTracking, which is a structure we made earlier that contains two optional HandAnchor objects, one for each hand.
Looking at the
Apple Documentation, we can see that we’ll need to use the handSkeleton property to get to the joint data.
The
HandSkeleton object contains a function joint(_ named: HandSkeleton.JointName) we can use to get data about a specific joint.
The
HandSkeleton.Joint object contains a anchorFromJointTransform property that we can use to get the position of the joint relative to its hand anchor.
💬 Note
You may also have a desire to use the
originFromAnchorTransformproperty on theHandAnchorobject to convert the joints to world space.However, we don’t need to do this. After all, we’re not interested in the world position of these joints. Only their relative positions to each other, all of which are under the same
HandAnchor.The math is the same, no matter what basis you’re using for your coordinate system, so long as all your data uses that same basis. There’s no need to waste time calculating the world transform matrix for each joint if we don’t have to.
Plan in place, let’s go through updateThumbContacts step by step.
We’re going to loop through each hand, updating the thumb’s status for each hand. If tracking data isn’t available for a hand, we’ll go through the resetThumbContact process to ensure the state is reset.
class ThrusterSystem : System {
  // ...
  func updateThumbContacts(deltaTime: Float) {
    for chirality in [
      HandAnchor.Chirality.left,
      HandAnchor.Chirality.right
    ] {
      guard let handAnchor = latestHandTracking.forChirality(chirality),
            let thumbTip = handAnchor.handSkeleton?.joint(.thumbTip),
            let middleFingerTip = handAnchor.handSkeleton?.joint(.middleFingerTip),
            let middleFingerKnuckle = handAnchor.handSkeleton?.joint(.middleFingerKnuckle) else {
        // Hand not tracked, skip
        resetThumbContact(chirality)
        continue
      }

      // -- Mark 1 --
      // ...
    }
  }
}
For each hand, ensuring tracking information is available, and skipping if not.
Now let’s extract the joint positions.
Obtaining Joint Positions
At this point, we have the transformation matrix of each joint, which tells us the position and orientation of the joint relative to the hand anchor.
A transformation matrix is a 4x4 matrix, of which the last column is the position of the joint. However, all we need is a 3D vector, so we take the first three elements of the final column.
class ThrusterSystem : System {
  // ...
  func updateThumbContacts(deltaTime: Float) {
    for chirality in [...] {
      // ...
      // -- Mark 1 --

      // Get the positions of the joints (relative to the hand anchor)
      let thumbPosition = thumbTip.anchorFromJointTransform.columns.3[SIMD3(0, 1, 2)]
      let middleFingerTipPosition = middleFingerTip.anchorFromJointTransform.columns.3[SIMD3(0, 1, 2)]
      let middleKnucklePosition = middleFingerKnuckle.anchorFromJointTransform.columns.3[SIMD3(0, 1, 2)]

      // -- Mark 2 --
      // ...
    }
  }
}
Extracting the positions of the thumb tip, middle finger tip, and middle finger knuckle.
Calculating U and V of the Projection Formula
Remember the projection formula from earlier?
From way back when?
…
It’s been a while, hasn’t it? It’s time to implement it.
\[ P_A(\mathbf{v}) = \frac{\mathbf{u} \cdot \mathbf{v}}{\mathbf{u} \cdot \mathbf{u}} \mathbf{u} \]In our case, u is the line from the middle finger tip to the middle finger knuckle, and v is the thumb tip.
But u and v don’t make good programming variable names, so let’s rename them to something more descriptive.
Let’s use lineAB for the line we’re projecting onto (middle finger tip to knuckle), and use pointP for the point we’re projecting.
We have to be careful about our coordinate spaces now. In order for the formula to work, everything has to be in the same coordinate space.
Our end result projected position will end up using the basis of lineAB, so we’ll have to pick which of the two points that define it (middle finger knuckle and middle finger tip) will be the ‘origin’ for our coordinate system.
In development, I arbitrarily decided to have the origin be the middle finger tip, but just as equally you could use the middle finger knuckle as the origin for the line instead.
So to get pointP in the same coordinate space, we’ll need to calculate the thumb tip’s position relative to the middle finger tip (the origin).
class ThrusterSystem : System {
  // ...
  func updateThumbContacts(deltaTime: Float) {
    for chirality in [...] {
      // ...
      // -- Mark 2 --

      // This code uses the middle finger tip as the origin.
      // However, you could equally use the middle knuckle as the origin.
      // Math doesn't care.

      // lineAB (U) - Line from middle finger tip to knuckle
      //              Lines are defined by the vector (destination - source)
      //              So, (knuckle - tip)
      let lineAB = middleKnucklePosition - middleFingerTipPosition

      // pointP (V) - Position of the thumb tip relative to lineAB's origin
      //             (This is the point we're going to project onto lineAB)
      let pointP = thumbPosition - middleFingerTipPosition

      // -- Mark 3 --
      // ...
    }
  }
}
Calculating the vectors lineAB and pointP for the projection formula.
Calculating T - Thumb Position on Line
Now that we have lineAB and pointP, we can calculate t as explained earlier.
But first, a note about lines.
Lines in math extend infinitely. That means sometimes when we project the thumb onto this line, the point will end up off the end of the user’s finger, or somewhere in the middle of their hand.
But we really want the projected point to end up somewhere actually on the user’s middle finger. So in order to keep the resulting projected point in the line segment we have, we’ll clamp t to be between 0 and 1.
This will ensure that the projected point lies within the line segment defined by the middle finger tip (t=0) and knuckle (t=1). This prevents the thumb’s projected position from extending beyond the physical length of the user’s finger.
class ThrusterSystem : System {
  // ...
  func updateThumbContacts(deltaTime: Float) {
    for chirality in [...] {
      // ...
      // -- Mark 3 --

      let t = dot(lineAB, pointP) / dot(lineAB, lineAB)

      // Clamp t to be between 0 and 1
      // (To the line segment between the knuckle and tip)
      let tClamped = simd_clamp(t, 0.0, 1.0)

      // -- Mark 4 --
      // ...
    }
  }
}
Calculating the t value for the thumb’s position on the line segment.
Calculating Thumb Distance to Line
Now that we’ve got t (Clamped) we can calculate the point on the line segment which is closest to the thumb tip.
We’ll do that by simply completing the projection formula, or in other words by multiplying tClamped by lineAB.
We can take that projected position, then figure out its distance to the actual thumb tip’s position. We do this by getting the length of the vector from the thumb position to the projected thumb position.
It’s very important to remember the basis of your vectors when doing math like this. We need the thumb position and the thumb’s projected position in the same basis.
The resulting vector from completing the projection formula will use lineAB’s basis, which has the middle finger tip as its origin.
So in order to calculate the projected thumb position’s distance to the actual thumb position, we’ll need the thumb tip’s position relative to the middle finger tip. We calculated that vector already, that’s pointP.
In other words, we want the length of the vector projectedThumbPosition - pointP.
class ThrusterSystem : System {
  // ...
  func updateThumbContacts(deltaTime: Float) {
    for chirality in [...] {
      // ...
      // -- Mark 4 --

      // Calculate the closest point on the line to the thumb tip
      let projectedThumbPosition = tClamped * lineAB

      // Calculate the distance between the thumb and the line
      let distanceBetweenThumbAndLine = simd_length(projectedThumbPosition - pointP)

      // -- Mark 5 --
      // ...
    }
  }
}
Calculating the projected thumb position and the distance between the thumb and the line.
Updating Thumb Status
Phew, we’ve done a lot of math. Now we’re back into the realm of good ol’ programming.
Now that we know how far the thumb is from the line, we can update the thumb’s status with whether it’s touching the line or not.
If it’s touching, we update the properties of the thumb status.
If not, we reset the thumb status.
class ThrusterSystem : System {

  private static let contactDistanceThreshold: Float = 0.025 // In meters, 2.5 cm. Arbitrarily picked, adjust as needed.

  // ...
  func updateThumbContacts(deltaTime: Float) {
    for chirality in [...] {
      // ...
      // -- Mark 5 --

      if distanceBetweenThumbAndLine < Self.contactDistanceThreshold {
        // Thumb is touching the line
        let newTimeTouching = max(0.0, self.handStatus[chirality]!.contactTime) + deltaTime
        self.handStatus[chirality]!.contactTime = newTimeTouching

        // Update T
        let previousT = self.handStatus[chirality]!.currentT ?? tClamped
        let currentT = tClamped

        self.handStatus[chirality]!.previousT = previousT
        self.handStatus[chirality]!.currentT = currentT
        self.handStatus[chirality]!.totalTChange += abs(currentT - previousT)
      } else {
        // Thumb is not touching the line
        resetThumbContact(chirality)
      }
    }
  }
}
Updating the thumb status based on the distance between the thumb and the line.
And that’s pretty much it for the updateThumbContacts function.
And that’s also pretty much it for the implementation of the ThrusterSystem class!
Let’s take a look at what it looks like in action.
Final Result
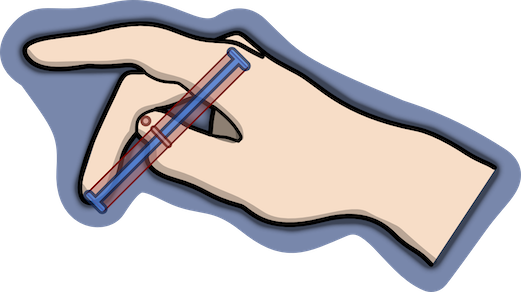
Debug Visualization
To better illustrate the system in action, I’ve created a debug visualization that shows the thumb’s projected position on the line, and the line itself. That’ll help us see what the system’s thinking without needing to also stare at a thruster in the scene.
The final result looks like this:
A debug visualization of the hand gesture system.
In this video, you can see a cylinder has been attached to my middle finger, which represents the line segment we’ve been talking about this whole time.
On the cylinder, sliding up and down it, is a sphere that represents the projected position of the user’s thumb.
You can see that as I move my thumb to touch my middle finger, things start to change color.
Let’s break down what’s happening. First with the cylinder:
- The cylinder starts out gray, and remains gray when the thumb is not touching the middle finger.
- The cylinder turns green when the thumb is detected to be touching the middle finger.
In addition to the cylinder, the sphere also changes colors:
- As long as the sphere is yellow, the current gesture is assumed to be a ’tap’.
- When the sphere turns blue, the user is detected to be dragging their thumb up or down the line.
The video makes it a little bit difficult to tell how well the gesture works because my finger and thumb are obscured by the visualization, but let me assure you that I’ve fiddled with the numbers to get things working pretty well (for my hands, at least).
💬 Note
My implementation differs slightly from what I’ve written in this guide. I’ve refined my code a lot as I wrote it, so there are minor differences between the video and tutorial.
For example: The
totalTChangeis not absolute in my app, so you’ll see it go positive and negative in the video.
Conclusion
💡 Key Takeaways
- Hand Tracking Integration: We leveraged ARKit’s hand tracking to capture complex gesture data.
- Mathematical Application: We applied linear algebra concepts such as projections and dot products to interpret hand movements.
- System Implementation: Finally, we implemented a responsive system that reacts to user gestures to manipulate in-app objects.
In conclusion, this is how I implemented a simple hand gesture system for Apple Vision.
The system allows for a tap and drag gesture to control a thruster in the Spatial Physics Playground app, using some fancy linear algebra.
Simple, but effective, and also open to expansion in the future.
For example, I intend on adding these controls onto each finger independently, and allowing the user to link up thrusters to different fingers.
You could also implement more complex taps, such as detecting taps on individual phalanxes (bones) of the fingers by checking the t value when the tap is completed.
There’s a lot of different directions you could go!
I hope you enjoyed this post, and I hope you learned something new about math and/or hand tracking on Apple Vision!